All Categories
Featured
Table of Contents
- – Rv Electrical Repair Silverado, CA
- – OCRV Center
- – Rv Awning Repair Silverado, CA
- – Repair Rv Silverado, CA
- – Motorhome Mechanic Near Me Silverado, CA
- – Rv Furnace Repair Silverado, CA
- – Rv Awning Repair Near Me Silverado, CA
- – Rv Furnace Repair Near Me Silverado, CA
- – Rv Refrigeration Repair Silverado, CA
- – Rv Fridge Repair Near Me Silverado, CA
- – Rv Furnace Repair Near Me Silverado, CA
- – Repair Rv Awning Silverado, CA
- – Local Rv Repair Silverado, CA
- – OCRV Center
Rv Electrical Repair Silverado, CA
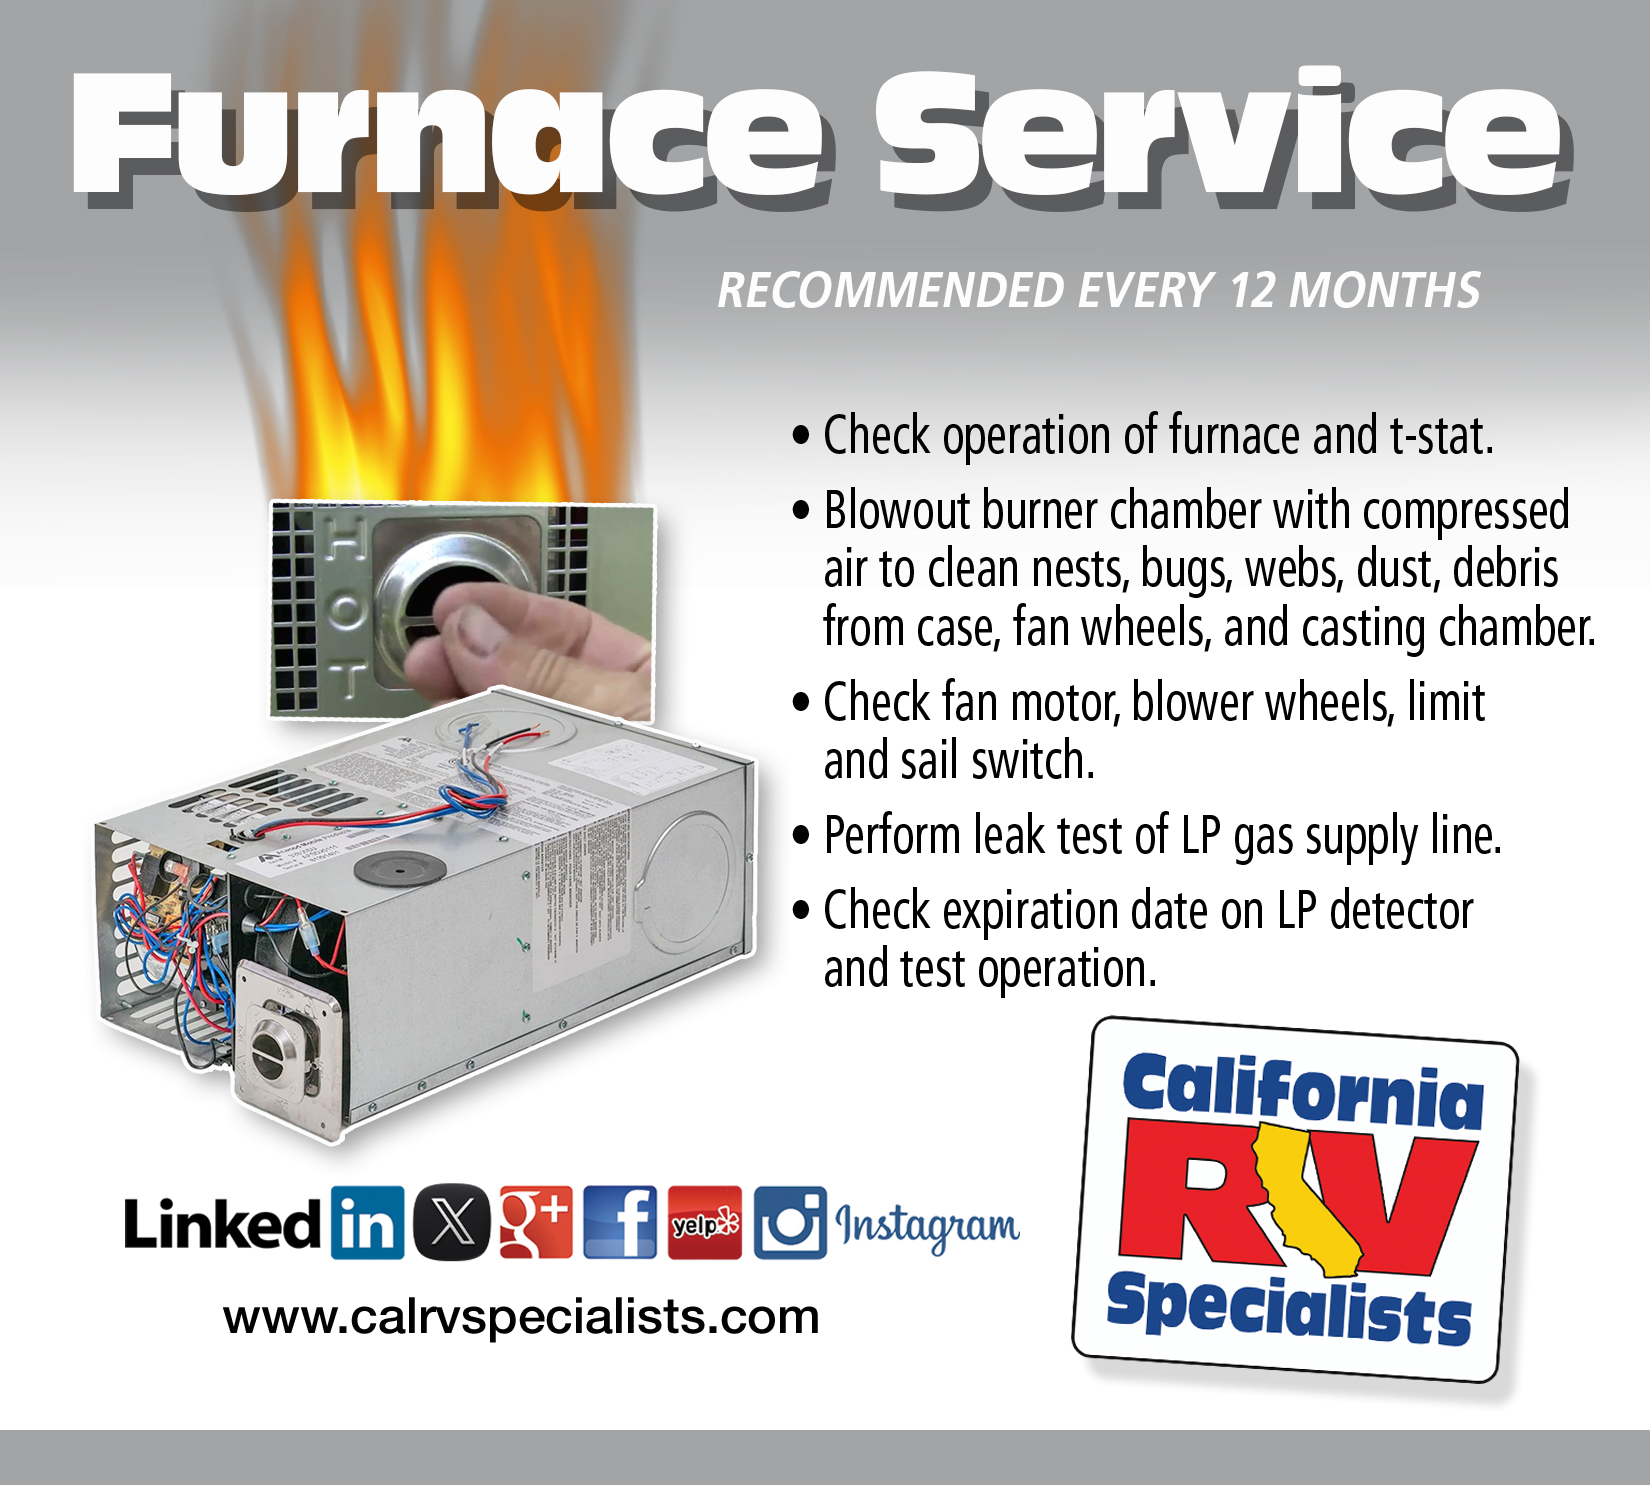
You can do this with your fingers. Usually, there are 2 tiny screws that hold the sail switch to the follower real estate. Get rid of these two screws, and then the sail switch need to come out. Silverado Rv Water Damage Repair. Bear in mind the direction of the slim sail when eliminating it. In my case, it was instantly apparent that the button had debris in between the sail and switch contact.
Examine/Clean or Change Sail Change I can have simply cleaned the button and re-installed it now, and we likely would have been great. Yet, after going with the workout to remove and reinstall the heater, I determined the most effective strategy was to place in the new sail switch.
Ensure you place the sail parallel as exactly how it was gotten rid of. Re-plugin the cords to the 2 terminals similarly they were separated. Vacuum Cleaner Heating System Area. I highly advise clearing out the furnace area while you have the heating system out. The main problem that besieges the sail button is drifting particles that locates its method right into the blower fan.
Rv Awning Repair Silverado, CA
Reinstall Heating System to Decking. With work handwear covers on, turn the furnace to the original position, raise it over any kind of limit, and put it back right into the recessed area.
Reattach the mounting screws into the heater deck to secure the heating system back to its initial area. If your threading had yellow propane tape, change the tape prior to reattaching the gas line. Or else, affix the gas line per the action of approximate torque the link had when the line was gotten rid of.
In my situation, it was a matter of connecting the electrical wiring harness to the gain access to location's ceiling using a brace and screw. Reinstall Heating System Ductwork This is carried out in reverse order to how they were eliminated. Make certain all ductwork is securely affixed. For my device, the side air duct was a hand-operated screw metal plate that needed to be placed in, while the front ducts were affixed with clamps.
This holds the manifold tightly to the external wall surface and supplies a measure of water resistance. Next off, we affixed the external steel exhaust manifold with the initial screws. Evaluate the Propane Connection with Soapy Water Open the valves to your gas containers. Usage soapy water positioned on the gas link at the furnace and search for bubbles.
Repair Rv Silverado, CA
Test the Heater Transform the thermostat to "Furnace" and increase the temperature level till the heating system blower follower comes on. You need to hear the heating system ignite within twenty secs or so of the heating system's blower fan coming on.
We have actually talked about several of these in even more information listed below. Your recreational vehicle heater thermostat is the primary control point that establishes when and just how much warm will be provided by the furnace. It lets you set the temperature level of your furnace, in addition to adjust it. Maintain your RV heater looking nice and cool by consisting of a furnace access door in your set up.
Motorhome Mechanic Near Me Silverado, CA
RV heater vents (especially flexible ones) enable you to personalize exactly how much air circulation appears of your heater. They additionally provide extra safety and security by acting as a barrier between you and the resource of heating; a must-have if you take a trip with toddlers or animals. Just like a car, the furnace motor is what maintains your system running.
For that reason, it is necessary that your motor is constantly in top form. You can purchase all of these parts with your neighborhood recreational vehicle furnace or devices shop, along with on web sites such as Amazon. Many motor home owners choose to install their heater themselves, while others choose to work with a professional to do the benefit them.
When acquiring your RV heater, the initial point to do is to guarantee it is certified with your design of RV. If picking to install the furnace yourself, the item's manual might come with installation guidelines, or you can also find a vast array of video tutorials on-line to assist you.
Rv Furnace Repair Silverado, CA
The first point to do is examine if the lp is activated. If it is, then your motor home heating system might be experiencing insufficient air circulation through the heating system, a bad lp shutoff at the heater, or a bad regulator at the propane tank. Examine your heater to make sure there aren't any obstructions.
If your heater hasn't been activated for rather some time, then this is responsible for the smell. Allow the furnace to compete a bit and you should quickly see that the odor vanishes. If the heater is still discharging a poor scent after this time, turn it off and make certain there isn't a propane leak.
Depending on your version of heater, you might have a pilot light. Modern Motor home heating systems have a straight trigger ignition system that changes a pilot light.
Rv Awning Repair Near Me Silverado, CA
If this holds true, then it's finest to call up your local recreational vehicle heating system professional. Initially, check all of the vents in your RV. There shouldn't be indications of residue on your exhaust vent, so this might be telling you there's inappropriate burning, which is leaving unburned gas as it is airing vent.
Outdoor camping is enjoyable, yet no one intends to invest a cool evening without warmth. Before you require your RV heating unit, you will certainly wish to make certain it's in good running problem, since it is used the least in your recreational vehicle. Here are a couple of easy RV heating unit repairing ideas and basic fixings, to give you an aiding hand.
Rv Furnace Repair Near Me Silverado, CA
If the heating system still does not run, try lighting a cooktop heater. This will make certain the range is getting lp. If the pilot won't light, examine to be sure you have lp. Another recreational vehicle heating system troubleshooting tip is: inspect the thermocouple. Make sure it is clear of any spider internet or insect nests.
If the thermocouple misbehaves, remove it and get one exactly the like the one you are changing. The thermocouple is a very easy and cost-effective repair service. The expense to get a new one is concerning $10.00. The thermocouple is a bimetallic sensor whose electrical resistance changes with temperature. This change in resistance is found by the control system, to ensure there is a fire before it opens the major gas valve.
The warm runs on 12V, not 110. Or else, maybe a tripped circuit breaker or a blown fuse. If it's a stumbled circuit breaker, reset it. Change the blown fuse. An additional fantastic recreational vehicle heater troubleshooting tip: if you see soot outside of the motor home by the exhaust air vent, check all vents.
Rv Refrigeration Repair Silverado, CA
It needs to be melting rather tidy. It is not normal to see residue on your exhaust air vent. With these ideas and valuable tips on basic repair work on your motor home heater, you should have the ability to fix and maintain your heating system in tip-top form (Silverado Rv Water Damage Repair). These fundamental repairs might be just what keeps you from making a costly telephone call.
The last point any person desires to hear (specifically after they've made the acquisition) is the dreaded news that there's a hill of fixings to compete with that may set you back as much as, otherwise more than, the motor home is worth. If the obligations related to possessing a motor home are brand-new to you and/or you're searching for support to improve acquainted with exactly how to use, care for, and keep your RV to obtain one of the most from it for years to find while keeping every person risk-free, we can assist with that as well.
Thanks for uploading this-- I hope I never ever require to watch it, however the moment might come.
The heater in your recreational vehicle is extremely similar to the one in your home. There's not an entire great deal of upkeep that's required of it, but there are some things that you require to know to make it run a lot more efficient and for fixing functions. Now, the heating system in this one, this happens to be a 2003 Brave and we're gon na take this cover off right here the behind and we can see that we've got a suburban design in this one and we have actually pulled this set out as an instance of what we have.
Rv Fridge Repair Near Me Silverado, CA
And the means the system functions is when you have your thermostat readied to the preferred temperature level and it calls for warmth, it's gon na undergo the motherboard, which we see on this device right here is gon na come into here and it's gon na start the follower to begin with.
It's gon na kind of tidy whatever out. And what it's likewise looking for is it wants to make certain we have appropriate follower rate, correct voltage coming in.
Rv Furnace Repair Near Me Silverado, CA
And it's gon na be sitting more such as this on the various other side of it. We need sufficient fan speed and airspeed to lift this and you listen to that little hitting in there. What that's doing is it's stating, fine, I have sufficient airspeed, I have adequate voltage so every little thing else is gon na work correctly in right here due to the fact that it's pushing this up and closing that circuit suggesting the voltage can undergo and tell every little thing is great before it starts to light the heater setting up.
And what that does is if this obtains also warm, then that's gon na once again, open and claim, no way, we have issues. We're gon na close the system down. And a pair of points that you require to be conscious of, on the within of your rig, you're either gon na have a plenum like this one runs all along the within and it's got the air duct job in the flooring simply like you would certainly in a home or you're gon na have a series of what we call elephant trucks, and they're the, trunks.
If you connect those vents up inside that recreational vehicle, then you limit the air flow. And that airflow then indicates that this is gon na warmth up, either our temps switch over is gon na shut the system off or our sail button is gon na shut it off. Same point with our corrugated hoses, if you begin keeping products in your cabinets, underneath, and you start squeezing those.
So again, we're gon na get either overheating on this side or we're gon na obtain that sail switch that is going to open up the circuit and claim, no way, we can not run. If your unit isn't running, there's a pair of things that we take a look at. The very first point is you have actually reached make sure that you comprehend that these run off a 12 volt system and you need a minimum of 10.5 volts for this fan to go quick enough to open up that sail button.
Repair Rv Awning Silverado, CA
It's gon na kind of tidy whatever out. And what it's additionally looking for is it desires to make sure we have appropriate follower rate, correct voltage coming in.
And it's gon na be sitting even more similar to this beyond of it. We require sufficient follower rate and airspeed to lift this and you listen to that little clicking in there. What that's doing is it's saying, fine, I have adequate airspeed, I have sufficient voltage so everything else is gon na function correctly in here due to the fact that it's pressing this up and shutting that circuit indicating the voltage can go with and tell every little thing is good prior to it starts to light the burner assembly
Local Rv Repair Silverado, CA
We have a thermal coupler or generally a temperature level sensor. And what that does is if this obtains too hot, then that's gon na again, open and state, nope, we have issues. We're getting as well warm. We're gon na close the system down. The whole thing will close down. And a number of things that you require to be mindful of, on the within your rig, you're either gon na have a plenum similar to this one runs all along the within and it's got the duct job in the floor just like you would in a home or you're gon na have a collection of what we call elephant trucks, and they're the, trunks.

If you connect those vents up inside that RV, after that you limit the air circulation. Which airflow after that indicates that this is gon na warm up, either our temps change is gon na shut the system off or our sail button is gon na shut it off. Very same point with our corrugated pipes, if you start storing products in your cabinets, below, and you begin pinching those.
OCRV Center
Address: 23281 La Palma Ave Yorba Linda, CA 92887Phone: (714) 909-1444
Email: art@ocrvcenter.com
OCRV Center
Again, we're gon na obtain either overheating on this side or we're gon na obtain that sail switch that is going to open the circuit and state, nope, we can not run. If your unit isn't running, there's a couple of things that we check out. The first thing is you have actually reached see to it that you recognize that these run a 12 volt system and you require at the very least 10.5 volts for this follower to go fast enough to open that sail switch.
Recreational Vehicle Repair Silverado, CARv Refrigerator Repair Silverado, CA
Rv Awning Repair Near Me Silverado, CA
Rv Furnace Repair Near Me Silverado, CA
Local Rv Repair Silverado, CA
Rv Electrical Repair Near Me Silverado, CA
Motorhome Roof Repair Silverado, CA
Rv Repair Shop Silverado, CA
Rv Water Damage Repair Silverado, CA
Rv Refrigeration Repair Silverado, CA
Rv Specialists Silverado, CA
Rv Refrigeration Repair Silverado, CA
Rv Repair Near Me Silverado, CA
Rv Electrical Repair Near Me Silverado, CA
Awning Repair Rv Silverado, CA
Repair Rv Silverado, CA
Rv Repair Near Me Silverado, CA
Rv Awning Fabric Repair Silverado, CA
Rv Repair Near Me Silverado, CA
Recreational Vehicle Repair Silverado, CA
Rv Specialists Silverado, CA
Recreational Vehicle Repair Silverado, CA
Rv Refrigerator Repair Silverado, CA
Repair Rv Awning Silverado, CA
Rv Specialists Silverado, CA
Rv Repair Shop Silverado, CA
Rv Repair Shop Silverado, CA
The Rv Repair Centre Silverado, CA
Local Rv Repair Silverado, CA
Rv Awning Repair Silverado, CA
Rv Furnace Repair Near Me Silverado, CA
Rv Repair Near Me Silverado, CA
Rv Awning Repair Silverado, CA
Rv Specialists Silverado, CA
Repair Rv Awning Silverado, CA
Awning Repair Rv Silverado, CA
Rv Electrical Repair Silverado, CA
Motorhome Mechanic Near Me Silverado, CA
Rv Furnace Repair Near Me Silverado, CA
Repair Rv Silverado, CA
Rv Refrigerator Repair Silverado, CA
Rv Awning Repair Near Me Silverado, CA
Awning Repair Rv Silverado, CA
Rv Furnace Repair Near Me Silverado, CA
Rv Blinds Repair Silverado, CA
The Rv Repair Centre Silverado, CA
Rv Repair Reviews Silverado, CA
Repair Rv Awning Silverado, CA
Rv Specialists Silverado, CA
Rv Fridge Repair Near Me Silverado, CA
Rv Repair Shop Silverado, CA
Rv Ac Repair Near Me Silverado, CA
Rv Awning Fabric Repair Silverado, CA
Rv Electrical Repair Silverado, CA
Motorhome Repairs Silverado, CA
Rv Furnace Repair Silverado, CA
Rv Refrigerator Repair Silverado, CA
Rv Electrical Repair Silverado, CA
Recreational Vehicle Repair Silverado, CA
The Rv Repair Centre Silverado, CA
Motorhome Roof Repair Silverado, CA
Rv Awning Fabric Repair Silverado, CA
Repair Rv Awning Silverado, CA
Rv Ac Repair Near Me Silverado, CA
Rv Blinds Repair Silverado, CA
Repair Rv Awning Silverado, CA
Motorhome Roof Repair Silverado, CA
Motorhome Repair Shops Near Me Silverado, CA
Rv Blinds Repair Silverado, CA
Rv Awning Repair Silverado, CA
Rv Awning Fabric Repair Silverado, CA
Rv Aluminum Siding Repair Silverado, CA
Rv Specialists Silverado, CA
Rv Furnace Repair Near Me Silverado, CA
Motorhome Repair Shops Near Me Silverado, CA
Rv Fridge Repair Near Me Silverado, CA
Local Rv Repair Silverado, CA
Rv Water Damage Repair Silverado, CA
In My Area Seo Pricing Silverado, CA
In My Area Seo Package Silverado, CA
Rv Water Damage Repair Silverado, CA
OCRV Center
Table of Contents
- – Rv Electrical Repair Silverado, CA
- – OCRV Center
- – Rv Awning Repair Silverado, CA
- – Repair Rv Silverado, CA
- – Motorhome Mechanic Near Me Silverado, CA
- – Rv Furnace Repair Silverado, CA
- – Rv Awning Repair Near Me Silverado, CA
- – Rv Furnace Repair Near Me Silverado, CA
- – Rv Refrigeration Repair Silverado, CA
- – Rv Fridge Repair Near Me Silverado, CA
- – Rv Furnace Repair Near Me Silverado, CA
- – Repair Rv Awning Silverado, CA
- – Local Rv Repair Silverado, CA
- – OCRV Center
Latest Posts
Mercedes Sprinter Repair Near Me Orange County
Montclair Mercedes Sprinter Van Service
Rv Fridge Repair Near Me Mira Loma
More
Latest Posts
Mercedes Sprinter Repair Near Me Orange County
Montclair Mercedes Sprinter Van Service
Rv Fridge Repair Near Me Mira Loma