All Categories
Featured
Table of Contents
- – Camper Service And Repair La Habra, CA
- – OCRV Center
- – Camper Roof Repair La Habra, CA
- – Camper Roof Repair La Habra, CA
- – Camper Trailer Repair Near Me La Habra, CA
- – Camper Roof Repair Near Me La Habra, CA
- – Camper Repair Places Near Me La Habra, CA
- – Camper Repair La Habra, CA
- – Camper Repair La Habra, CA
- – Camper Repair Shop Near Me La Habra, CA
- – Camper Repair And Service La Habra, CA
- – Camper Awning Repair La Habra, CA
- – Camper Repair Shop La Habra, CA
- – Camper Services La Habra, CA
- – OCRV Center
Camper Service And Repair La Habra, CA
I found a lot of water damages in the plywood under the fiberglass panel so I'll probably be replacing it. Which implies I'll finish getting rid of those edge trim items all the means down after all. We'll get to that later on. I had a substantial quantity of water damage in the joint between the rounded edge and the roof deck.
The side of the roofing outdoor decking is subjected at the back of the camper! I've revealed the roofing substratum at the back edge of the camper. Remove some screws from the corner trim holding down the fiberglass panel.
Again, I tore that layer up as well (there had not been much stifling but adhesive now) and afterwards I can tug out the remainder of the rubber roof covering that was glued beneath it. Currently I can pull out the last little bit of rubber roof covering from beneath the fiberglass and luan plywood.
Camper Roof Repair La Habra, CA
I observed there were no fasteners holding the roofing plywood down. I can see the blue styrofoam insulation below the harmed locations of luan plywood on the roof. Notice there are no bolts at all holding down the roof covering plywood!
The whole thing began to draw up easily in one piece without harming the foam board insulation at all. After that the plywood began peeling off up as one item, leaving all the styrofoam well intact.
There is a metal enhanced tape under that signs up with the pieces together. I do not know exactly how exactly they took care of to glue everything down so well and get this tape joining them from the underside, but it was perfectly done. The pieces of roof covering ply are collaborated at the seams below with a metal-reinforced tape.
Camper Roof Repair La Habra, CA
I quickly recognized the roof was shedding toughness and rigidity as I brought up the leading layer, so broke it off right before the initial joint. A close of the metal framing in the roofing: one inch wide, one and a half inches tall. Below's a detail of the electrical wiring in the insulation foam and the solid wood supports where the antennas screw right into the roofing system.
Looking at all-time low of the roof covering ply I removed you can see that it had a really total adhesive bond with heaven foam in-between, producing a solid lamination impact. Below is an illustration I made that details how the roof covering is built, just how the roofing framing works, and how all the layers are overlapped at the front and rear of the motor home rubber roofing.
Camper Trailer Repair Near Me La Habra, CA
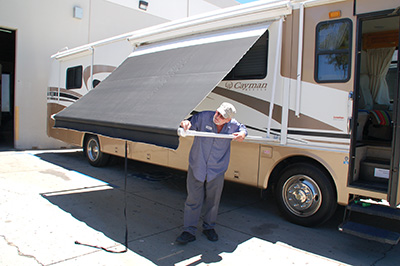
The two most typical sorts of recreational vehicle awnings on rigs today are: Side-frame awnings, with upright frame sustains placed down the side of the motor home. The various other type are side "floating" arm awnings with much less framework framework. They make use of straight awning assistance arms placed only near the top of the motor home.
There is argument as to which framework and running style is better. La Habra Pop Up Camper Repair. Please attempt again later. RVers enjoy their awnings for numerous reasons: Motor home awnings offer comfort and color from the hot summertime sun.
"An ounce of prevention deserves a pound of treatment." That old claiming additionally relates to your motor home awning. To extend the life of your awning, and maintain it looking excellent, normal upkeep and cleaning is needed. The good news is, there is not a lot involved with everyday upkeep of motor home awnings and structures.
As your Recreational vehicle rolls down the highway, taking in every bump, crack, and pocket, points can loosen up over time. Several awnings have adjustment screws and bolts that enable you to establish preferred angles for more or much less shade.
Camper Roof Repair Near Me La Habra, CA

Ensure to put on eye security while seeking out and scrubbing the awning. Rub both the top and underside of the awning. Moderate soap or dish soap and water The majority of mild for awning fabric. White vinegar and water mixture Equal parts of each. LA's Absolutely Incredible Cleaner Weaken with warm water and rinse well.
Repair tape fix for tiny to medium tears. (Picture: Erik Anderson) A crucial initial action is cleaning the repair location well to make sure good bond of the tape or patch. We recommend putting the patch both on the top and on the base of the broken location. You'll wish to rub the repair service spot securely on both sides to produce a strong bond.
Make certain your tape or spot does not have square corners. Cut the edges in a distance for much better long-lasting attachment. Square corners have a tendency to even more quickly raise and peel off, reducing the life of your motor home awning fixing. We dislike to consider it, I recognize, but occasionally the only thing to do is replace your motor home awning material.
Camper Repair Places Near Me La Habra, CA
Each has an interesting web site and with easy online and phone getting. Preferably, you should buy awning textile that is heavy obligation and offers the finest UV protection that your spending plan permits. Pricing variesa great deal. Be certain to shop around.: Ordering your awning textile online might seem most convenient.
You and your assistants will certainly slide the new awning fabric into the top and reduced networks. Examination for proper RV awning operation. Change material positioning as required.
As a DIY job, you can conserve cash and feasible loss of use of your recreational vehicle if you or else needed to leave it at a shop. There you have it! Proper treatment and upkeep of your RV awning can lengthen it's life and maintain it useful. Currently it's time to roll out that awning, kick back on your campground in the amazing color, and reeeelax! This article may include associate links or state our own products, please have a look at our disclosure plan here.
Camper Repair La Habra, CA
Damages to your RV awning can range from tiny rips and openings to extreme wear that compromises the integrity of the material. The method of fixing generally relies on the severity of the damage and the kind of material. Patching is an usual technique of repairing little to huge tears or holes.
For a simple repair, make certain the tape covers an area larger than the damages which the adhesive suits your awning's material kind. Strings are most likely the best choice for splitting up at the edges or where additional stamina is needed. This technique is particularly efficient for acrylic awnings, where the breathable material can hold up against needlework without jeopardizing its honesty.
Camper Repair La Habra, CA
If the damage is as well substantial to stitch or stitch, awning substitute textile may be the only feasible option. Generally when there is hefty mold, the mold and mildew, or textile, comes to be fragile and splits in lots of places. Substitute awnings provide the opportunity to update materials or style, enhancing the look and capability of your RV.
I concur with Gary, sounds like the product is going negative (peeling). I think it's appropriate at the edge that is still revealing when the awning is rolled up. Because that area is constantly subjected to the sunlight and weather. Another option could be if you can discover a furniture or canvas shop ready to do it, you can possibly take the material off (google for guidelines) and have them reduce off the damaged part and resew the "bead" (really called "Keder welt") back on to it.
Ideally, you can catch your own prior to the product or supports are to the factor of needing replacement. Probably, if a hole is less than three feet, you can fix the material. So, if that's the situation, start your troubleshooting by judging the dimension of RV awning repair work needed below.
Make an awning examination prior to any kind of outdoor camping journey. Begin any type of evaluation by washing the awning on both the underside and topside. Normally, a roof perspective helps you clearly evaluate the damage (La Habra Pop Up Camper Repair). Depending upon the damage the material might need to be eliminated from the roller. Fixing little openings or rips is best accomplished with tape.
Camper Repair Shop Near Me La Habra, CA
Camping tent spot sets work excellent for awning fabric. Over time, awning fabrics or sewing compromise in the sun and will certainly come to be weak.
Discover matching textile to cover the tear, and utilize durable glue that works with your material. Generally, this is a vinyl cement. Bonds in Hard Problems You can use our American madeSturdy and Flexible Our highly regarded HH-66 Vinyl CementRepair Numerous Types of Vinyl Use HH-66 Plastic Cement forSometimes, if the sewing thread is not UV-resistant sufficient, it can fail.
You need to replace it with a UV-resistant and long lasting string. If the damages is also considerable to repair thoroughly, you may have to replace the entire awning fabric item. Each sort of awning material replacement will certainly be different depending upon the producer. Doing an on-line search will certainly produce how-to video clips you can follow to DIY awning fabric substitute.
Provided that there are numerous different kinds of awnings we can not cover each below, yet once again a google and youtube search normally will yield good DIY results. Take into consideration These Cool Girard Motor Home Awnings That Have No Support Arms for your recreational vehicle. If your fixing is only a tiny opening there are a couple of dedicated awning fixing tapes that work quite well.
Camper Repair And Service La Habra, CA
Sale REPAIRS TEARS & RIPS IN AWNINGS, CANVAS, TENTS & EVEN MORE: Our clearWATERPROOF & CLIMATE RESISTANT: Our textile repair service tape works as aULTRA-DURABLE & FLEXIBLE YET SPLIT RESISTANT: Our clear fabricFor larger repair services, a bigger stronger tape is suggested. We very advise gorilla tape weatherproof clear 4-inch wide tape (La Habra Pop Up Camper Repair). This things is incredibly sticky and solid and holds up to all climate condition and water
Rainfall will run straight off it, but let the awning completely dry thoroughly before rolling it up, as trapped wetness is the ideal setting for mold and mildew. The expense of vinyl replacement can range from $150 to over $1,000 relying on the size and thickness of the product. This awning topper may be extended by trimming the torn sides and taping them, yet most likely, the sunlight damage is excessive, and it will need changing.
This sounded wonderful for the variety of camping problems we locate ourselves in. And also, their items feature a 5-year service warranty, need to last 10 to 15 years, and are made in Brush Meadow, Washington, United States. Tough Top Awnings additionally supplies quotes right on their site after you fill in some dimensions and specifications, plus any accessories you need for your installment.
Camper Awning Repair La Habra, CA
Prices are going to vary according to the top quality, product kind, and dimension of your awning. Plastic and acrylic fabrics cost concerning the exact same per square backyard, varying from $150 to $400 for slide awnings and $450 to $1,200 for full awnings, depending on dimension and thickness.
Discover matching material to cover the tear, and use sturdy adhesive that works with your textile. Usually, this is a vinyl concrete. Bonds in Tough Conditions You can apply our American madeSturdy and Adaptable Our very regarded HH-66 Plastic CementRepair Several Kinds of Vinyl Use HH-66 Vinyl Cement forSometimes, if the stitching thread is not UV-resistant enough, it can fail.
If the damages is too significant to fix completely, you might have to change the whole awning fabric piece. Doing an on-line search will certainly yield how-to videos you can follow to DIY awning textile substitute.
Camper Repair Shop La Habra, CA
Offered that there are so many various types of awnings we can not cover each below, however once again a google and youtube search normally will yield great DIY outcomes. If your fixing is just a small hole there are a couple of committed awning repair tapes that function rather well.
Sale Repair Works TEARS & RIPS IN AWNINGS, CANVAS, TENTS & EVEN MORE: Our clearWATERPROOF & WEATHER RESISTANT: Our material repair tape works as aULTRA-DURABLE & FLEXIBLE YET SPLIT RESISTANT: Our clear fabricFor larger fixings, a larger stronger tape is suggested. We very suggest gorilla tape weatherproof clear 4-inch large tape. This things is very sticky and strong and stands up to all weather and water.
Rain will run right off it, but let the awning completely dry completely prior to rolling it up, as caught moisture is the ideal setting for mold. The cost of vinyl substitute can run from $150 to over $1,000 relying on the size and thickness of the material. This awning mattress topper could be extended by cutting the torn sides and taping them, however most likely, the sunlight damages is excessive, and it will certainly require replacing.
This appeared excellent for the variety of camping problems we discover ourselves in. And also, their items include a 5-year guarantee, should last 10 to 15 years, and are made in Brush Grassy field, Washington, U.S.A.. Hard Top Awnings also gives price quotes exactly on their site after you fill out some measurements and specifications, plus any accessories you need for your installment.
Camper Services La Habra, CA
This business has actually additionally established a fantastic track document of outstanding high quality items and customer support. Costs are mosting likely to differ according to the quality, product kind, and size of your awning. This coincides for your slide toppers. Vinyl and acrylic textiles cost concerning the very same per square backyard, differing from $150 to $400 for slide awnings and $450 to $1,200 for full awnings, depending on dimension and density.
Camper Trailer Repair La Habra, CACamper Roof Repair La Habra, CA
Camper Roof Replacement La Habra, CA
Pop Up Camper Canvas Repair La Habra, CA
Camper Air Conditioner Repair Near Me La Habra, CA
Camper Roof Repair La Habra, CA
Camper Trailer Service Near Me La Habra, CA
Camper Repair Shop La Habra, CA
Camper Repair La Habra, CA
Camper Repair Places Near Me La Habra, CA
Camper Roof Replacement La Habra, CA
Camper Repair Near Me La Habra, CA
Rv Camper Ac Repair La Habra, CA
Camper Service La Habra, CA
Camper Repair Shop La Habra, CA
Camper Repair La Habra, CA
Camper Service Near Me La Habra, CA
Camper Services La Habra, CA
Rv Camper Repair La Habra, CA
Rv Camper Ac Repair La Habra, CA
Camper Roof Repair La Habra, CA
Camper Trailer Service Near Me La Habra, CA
Camper Repair Shop Near Me La Habra, CA
Camper Roof Repair Near Me La Habra, CA
Camper Roof Repair La Habra, CA
Camper Service And Repair La Habra, CA
Pop Up Camper Roof Repair La Habra, CA
Rv Camper Repair Near Me La Habra, CA
Camper Repair And Service La Habra, CA
Camper Awning Replacement La Habra, CA
Camper Repair And Service La Habra, CA
Camper Trailer Repair Near Me La Habra, CA
Camper Trailer Repair La Habra, CA
Camper Trailer Repair Near Me La Habra, CA
Camper Repair Near Me La Habra, CA
Camper Service La Habra, CA
Camper Repair La Habra, CA
Camper Roof Replacement La Habra, CA
Camper Repair La Habra, CA
Camper Repair Places Near Me La Habra, CA
Camper Service And Repair La Habra, CA
Camper Services La Habra, CA
Camper Roof Repair Near Me La Habra, CA
Pop Up Camper Roof Replacement La Habra, CA
Camper Roof Repair La Habra, CA
Camper Repair Shop La Habra, CA
Camping Repair Near Me La Habra, CA
Pop Up Camper Roof Repair La Habra, CA
Camper Service Center La Habra, CA
Camper Repair Shop La Habra, CA
Rv Camper Repair La Habra, CA
Camper Service Center La Habra, CA
Camper Repair Shops Near Me La Habra, CA
Camper Services La Habra, CA
Camper Roof Repair Near Me La Habra, CA
Pop Up Camper Roof Repair La Habra, CA
Camper Trailer Repair Near Me La Habra, CA
Camper Repair And Service La Habra, CA
Rv Camper Repair La Habra, CA
Camper Repair Shop Near Me La Habra, CA
Camper Trailer Service Near Me La Habra, CA
Camper Awning Repair La Habra, CA
Pop Up Camper Roof Replacement La Habra, CA
Camper Repair Near Me La Habra, CA
Pop Up Camper Repair Near Me La Habra, CA
Camper Trailer Service Near Me La Habra, CA
Camper Awning Replacement La Habra, CA
Pop Up Camper Canvas Repair La Habra, CA
Camper Repair And Service La Habra, CA
Camper Trailer Repair La Habra, CA
Camper Repair La Habra, CA
Camper Trailer Service Near Me La Habra, CA
Camper Repair And Service La Habra, CA
Rv Camper Ac Repair La Habra, CA
Camper Services La Habra, CA
Camper Repair And Service La Habra, CA
Camper Trailer Repair La Habra, CA
Rv Camper Repair La Habra, CA
Find A Good Top Seo Company La Habra, CA
Close To Me Seo Services Pricing La Habra, CA
OCRV Center
Table of Contents
- – Camper Service And Repair La Habra, CA
- – OCRV Center
- – Camper Roof Repair La Habra, CA
- – Camper Roof Repair La Habra, CA
- – Camper Trailer Repair Near Me La Habra, CA
- – Camper Roof Repair Near Me La Habra, CA
- – Camper Repair Places Near Me La Habra, CA
- – Camper Repair La Habra, CA
- – Camper Repair La Habra, CA
- – Camper Repair Shop Near Me La Habra, CA
- – Camper Repair And Service La Habra, CA
- – Camper Awning Repair La Habra, CA
- – Camper Repair Shop La Habra, CA
- – Camper Services La Habra, CA
- – OCRV Center
Latest Posts
Placentia Fleet Services
Rv Engine Repair Near Me Anaheim
Motorhome Paint Repair Irvine
More
Latest Posts
Placentia Fleet Services
Rv Engine Repair Near Me Anaheim
Motorhome Paint Repair Irvine