All Categories
Featured
Table of Contents
- – Rv Camper Repair Near Me Riverside, CA
- – OCRV Center
- – Camper Service Center Riverside, CA
- – Camper Repair Near Me Riverside, CA
- – Camper Awning Replacement Riverside, CA
- – Camper Trailer Repair Near Me Riverside, CA
- – Camper Repair Shop Riverside, CA
- – Camper Awning Replacement Riverside, CA
- – Camper Awning Repair Riverside, CA
- – Camper Services Riverside, CA
- – Camper Services Riverside, CA
- – Camper Air Conditioner Repair Near Me Rivers...
- – Pop Up Camper Repair Near Me Riverside, CA
- – Pop Up Camper Repair Riverside, CA
- – Camper Service Center Riverside, CA
- – OCRV Center
Rv Camper Repair Near Me Riverside, CA
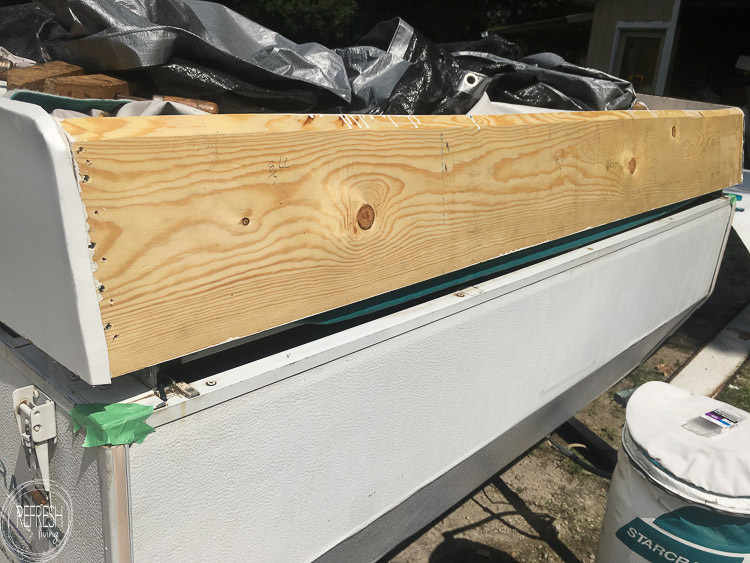
Luckily, we really did not require to change the interior 1 x 2 framework, and consequently we could maintain the skin and foam affixed. To remove the 1 x 2 items that were still attached, I used a small, 4-1/2 small circular saw to cut from the bottom right along the edge of the 1 x 2.

I rebuilt this structure when the roof covering was separated from the camper, resting on the sawhorses. To develop an exact dimension match of the side panels, you can make use of the old sides as a design template. If your old sides are so water damaged that they break down into little items (like mine did), then use the old light weight aluminum skin that was affixed to the old timber as your design template.
Instead, we chose to make use of 1 boards (which are in fact 3/4 thick) - Pop Up Camper Repair Near Me Riverside. To compensate for the distinction in thickness, we simply made use of a router to scratch away 1/4 from the ends where the boards would meet.
Camper Service Center Riverside, CA
Connect the sides boards to the lift arms. I used timber glue and slim trim screws to affix the front and rear roof covering sides to both side panels. After the back and front of the roof framework was developed, it was time to affix the ceiling (with the top light weight aluminum skin still affixed) to the camper.
I dipped each screw in Dicor Lap Sealer as a means to safeguard versus water slipping in the in the future. You can see where we screwed the roofing sideways in the video clip listed below. I made use of call cement to connect the light weight aluminum roof skin to the back and front timber boards.
Camper Repair Near Me Riverside, CA
I'm dealing with a full blog post on just how to remove silicone caulk from a recreational vehicle and how to remove old butyl tape residue. I'll connect that below as quickly as it's completed. The product I determined to make use of to make sure none of those joints took any even more water was Eternabond Tape.
Update: I have actually been utilizing Eternabond tape for 7 years on various campers and it is my go-to product for external RV repair services. I started with the side seams of my camper and applied one long run of the tape across each joint.
There are a few tricks to using this tape, and you have to take care concerning overlapping items, since in some cases water can still slip in. You can see even more information on utilizing this tape in the video clip below. After the roof covering is affixed back to the lifting braces, you can connect the canvas back to the roof covering.
Due to the fact that we decided to just replace the 1 x 2 outside frame of the roofing system and recycle the foam and indoor paneling, I absolutely needed to find up with a solution to cover the component of the roofing that had peeled off away as a result of the water damage. Right here you'll locate the full tutorial on how to utilize glue up ceiling ceramic tiles in a RV to offer the inside a totally new look.
Camper Awning Replacement Riverside, CA
We have not had any kind of leaks or water getting in the camper! We maintain it saved outside (and are located in north Illinois where it rains, snows, and hails), but to be secure we covered it with an item of 4 mil plastic, and after that put a tarpaulin in addition to that for the winter months.
The trim strips that lie level in addition to the camper (at the front and back) are generally covered with a RV lap sealant, similar to the screw directly all the roof covering components. On the sides, the rubber roof covering twists around the side of the camper and the trim strip is attached sideways of the camper in addition to the rubber.
Right here's just how to get rid of the roof covering trim molding during a RV roofing repair service task! Since one of the side trim moldings is likewise the awning rail (which holds the side of the awning canvas to the camper) I have actually split this into two messages. The 2nd one will certainly show you how to remove a recreational vehicle awning.
Camper Trailer Repair Near Me Riverside, CA
I chose to start with the back discontinuation bar. As you can see it is entirely hidden in lap sealer, motor home roof covering covering, and numerous caulking work from over the years. You can rarely inform it exists! Time to begin digging. Customarily, I start by removing any type of continuing to be rubber roof covering with an utility knife, right approximately the side of the trim.
The rear discontinuation bar (roofing system trim molding) is entirely hidden with lap sealer, caulk, and a RV roofing covering. I've removed a few of the rubber and scraping up the lap sealant and caulk to expose the screw heads. When you've revealed some screw heads and eliminated some screws you can begin raising the trim strip.
Camper Repair Shop Riverside, CA
Keep in mind that the side trim has a plastic insert instead of lap sealer. Some of the screws will certainly be corroded and hard to turn or simply spinning in their hole.
Sometimes I make use of pliers. When I got all the screws out and raised up the trim molding, I attempted scraping away some of the Motor home roofing system finish that had actually painted over it.
Camper Awning Replacement Riverside, CA
Bear in mind, an 8 foot area of flat trim molding prices $15 to $20 and they're tough to find online. I hate to lose able to be used products but it depends on you to make a decision just how much your time is worth! Attempting to tidy up old recreational vehicle roof sealer from the level trim molding is not enjoyable.
Basically the exact same deal as the back one. I cut away any kind of continuing to be rubber and began prying up sealer from the screw heads. The trim strip at the leading edge of the rubber roofing system (aka discontinuation bar). This is additionally buried in layers of lap sealant, caulk, and roofing covering repairs.
Camper Awning Repair Riverside, CA
That will certainly have to be covered carefully later on with a self leveling lap sealer or a securing tape, or both! As soon as all the screw heads are revealed and gotten rid of, I peeled off up the termination bar and saw exactly how the layers were piled underneath.
That's since there is no lap sealer on the screw heads! Instead there is a vinyl trim insert that fits inside the trim molding and covers the screw heads.
Thats due to the fact that it was wrapped around beneath the end and determined with the trim strip. So I sufficed with an utility blade and after that started taking out the vinyl trim insert from the molding. Hurray! Tidy screw heads! Starting to bring up the vinyl trim insert from the side roof trim molding.
An information of the edge of the camper roofing system when the trim and rubber have been eliminated. So currently there is just one item of roofing system trim molding left to eliminate: the one beyond of the camper. This one is a little a lot more complex since this trim item also occurs to double as the awning rail which supports the canvas of the awning to the side of the camper.
Camper Services Riverside, CA
Head on over! Next up, removing the awning! (See next message.).
Find out extra info regarding RV insurance policy protections and exactly how the process works for filing a motor home insurance coverage case. If the awning on your motorhome or traveling trailer is damaged as a result of your neglect, it likely won't be covered by a typical recreational vehicle policy. If your awning deteriorates due to long-term sun direct exposure, that could be taken into consideration wear and tear and may not be covered.
These types of protection endorsements might not be readily available, particularly if you reside in your recreational vehicle full-time. If your motor home's roofing leakage is the outcome of extreme weather condition, you may be covered for motor home roof covering damages if you can confirm the leakage arised from the incident. Nevertheless, a leak that develops due to your negligence often won't be covered.
Camper Services Riverside, CA
Keep reviewing to discover a few of the means you can identify and repair recreational vehicle roofing leaks. Not certain exactly how to obtain begun? Right here's a step-by-step guide I drew up that I wish someone had offered me when I started my RV journey. When it comes to RV repair and maintenance, the roofing system should always be checked thoroughly and on a regular basis.
Now that your RV roofing system is tidy, you prepare to secure! But prior to obtaining started, it's crucial to note that when it concerns RV roof covering leakages, there isn't a one size fits all option. Each leakage is one-of-a-kind and relying on its size and location, it might call for a certain sort of repair.
Motor Home Roof Leak Repair Work: Emergencies Conveniences: Can be used on a wet surface, making it best for a fast repair for smaller sized leaks during or after a tornado. Pro Pointer: Make sure to utilize sufficient tape to hide the hole or space totally, leaving concerning an inch of tape right around the afflicted area to get the finest coverage.
Camper Air Conditioner Repair Near Me Riverside, CA
Motor Home Roof Leak Repair Service: Targeting Particular Areas Benefits: Great for a longer-term service. Pro Pointer: Hold the can at a 45-degree angle and apply directly to the issue location being treated.
Pro Suggestion: Before using this item, you'll wish to make certain the surface is dry. Make certain to properly evaluate it on a little area first prior to applying it on a big surface. Multiple coats are urged! You should allow 24-48 hours for the item to cure prior to each layer.
Pop Up Camper Repair Near Me Riverside, CA
While no Recreational vehicle roofing lasts permanently, proper maintenance is vital for its longevity. With regular examination and the power of The Flex Seal Household of Products, you can help expand your Motor home roof covering's life and keep it going strong as you appreciate the wonderful outdoors.
Asen is a permanent motor home tourist considering that 2018 and is the proprietor of the blog site, Camper Life. He enjoys camping in nature, fishing, and spending time with his household. Aiming to offer one of the most useful details about campers and Recreational vehicles, he shares everything he discovered throughout the years.
Keep reviewing to learn some of the methods you can recognize and repair recreational vehicle roof covering leakages. Unsure exactly how to get going? Right here's a detailed overview I drew up that I want someone had actually provided me when I started my recreational vehicle trip. When it pertains to RV repair and maintenance, the roof covering ought to constantly be inspected carefully and consistently.
Now that your RV roof covering is tidy, you prepare to secure! Yet prior to obtaining began, it is necessary to note that when it concerns motor home roofing system leakages, there isn't a one dimension fits all service. Each leakage is one-of-a-kind and relying on its size and area, it may call for a particular kind of fix.
Pop Up Camper Repair Riverside, CA
RV Roofing Drip Repair Work: Emergencies Perks: Can be used on a damp surface area, making it perfect for a quick fix for smaller sized leaks during or after a storm (Pop Up Camper Repair Near Me Riverside). Pro Idea: Make certain to make use of sufficient tape to hide the opening or space entirely, leaving about an inch of tape all the way around the affected location to obtain the most effective protection
Motor Home Roofing System Leak Repair: Targeting Certain Locations Advantages: Great for a longer-term solution. Commonly utilized around vents and various other seams that require resealing. Pro Suggestion: Hold the can at a 45-degree angle and apply directly to the trouble area being treated. Flex Shot takes around 24-48 hours to heal and need to be used on a completely dry surface.
Pro Pointer: Before using this product, you'll desire to make sure the surface area is dry. Be certain to effectively check it on a small location first prior to using it on a big surface.
Camper Service Center Riverside, CA
Use appropriate security tools like handwear covers and protective eyeglasses as required. Use painter's tape and cover the areas you desire to avoid layer, especially joints and various other moving parts. While no RV roofing system lasts permanently, appropriate upkeep is vital for its longevity. With normal evaluation and the power of The Flex Seal Household of Products, you can help prolong your recreational vehicle roof covering's life and maintain it going solid as you enjoy the outdoors.
Asen is a permanent recreational vehicle traveler since 2018 and is the proprietor of the blog, Camper Life. He loves camping in nature, angling, and spending quality time with his family. Striving to give the most important details about campers and Motor homes, he shares whatever he discovered for many years.
Rv Camper Repair Near Me Riverside, CACamper Service And Repair Riverside, CA
Pop Up Camper Roof Repair Riverside, CA
Rv Camper Repair Near Me Riverside, CA
Camper Trailer Repair Riverside, CA
Rv Camper Repair Riverside, CA
Camper Repair Riverside, CA
Pop Up Camper Canvas Repair Riverside, CA
Camper Trailer Repair Near Me Riverside, CA
Pop Up Camper Canvas Repair Riverside, CA
Camper Repair Near Me Riverside, CA
Camper Repair Near Me Riverside, CA
Pop Up Camper Canvas Repair Riverside, CA
Camper Repair Near Me Riverside, CA
Pop Up Camper Canvas Repair Riverside, CA
Camper Trailer Service Near Me Riverside, CA
Camper Trailer Service Near Me Riverside, CA
Pop Up Camper Repair Near Me Riverside, CA
Pop Up Camper Roof Repair Riverside, CA
Camper Trailer Repair Near Me Riverside, CA
Camper Service Riverside, CA
Camper Services Riverside, CA
Rv Camper Repair Near Me Riverside, CA
Camper Repair Shop Riverside, CA
Camper Repair Near Me Riverside, CA
Camper Repair Places Near Me Riverside, CA
Camper Roof Repair Near Me Riverside, CA
Camper Roof Replacement Riverside, CA
Camper Service Riverside, CA
Pop Up Camper Repair Near Me Riverside, CA
Pop Up Camper Roof Replacement Riverside, CA
Camper Service Near Me Riverside, CA
Camper Repair Near Me Riverside, CA
Camper Repair And Service Riverside, CA
Pop Up Camper Canvas Repair Riverside, CA
Rv Camper Repair Riverside, CA
Camper Service Riverside, CA
Camper Repair Shop Riverside, CA
Rv Camper Repair Near Me Riverside, CA
Pop Up Camper Canvas Repair Riverside, CA
Camper Roof Replacement Riverside, CA
Rv Camper Ac Repair Riverside, CA
Camper Service And Repair Riverside, CA
Camper Trailer Repair Near Me Riverside, CA
Camper Repair And Service Riverside, CA
Pop Up Camper Canvas Repair Riverside, CA
Camper Repair And Service Riverside, CA
Camper Trailer Repair Near Me Riverside, CA
Camper Awning Replacement Riverside, CA
Rv Camper Repair Near Me Riverside, CA
Camper Repair Near Me Riverside, CA
Camper Repair Shop Riverside, CA
Camper Repair Shops Near Me Riverside, CA
Camper Services Riverside, CA
Camper Trailer Service Near Me Riverside, CA
Rv Camper Repair Near Me Riverside, CA
Rv Camper Repair Riverside, CA
Pop Up Camper Roof Repair Riverside, CA
Camper Services Riverside, CA
Pop Up Camper Roof Repair Riverside, CA
Pop Up Camper Canvas Repair Riverside, CA
Pop Up Camper Repair Near Me Riverside, CA
Pop Up Camper Roof Repair Riverside, CA
Camper Repair Places Near Me Riverside, CA
Camper Service And Repair Riverside, CA
Pop Up Camper Roof Replacement Riverside, CA
Rv Camper Ac Repair Riverside, CA
Camper Services Riverside, CA
Rv Camper Ac Repair Riverside, CA
Camper Service Near Me Riverside, CA
Pop Up Camper Repair Near Me Riverside, CA
Camper Awning Replacement Riverside, CA
Camper Roof Replacement Riverside, CA
Camper Trailer Repair Riverside, CA
Rv Camper Repair Near Me Riverside, CA
Rv Camper Repair Near Me Riverside, CA
Camper Repair Places Near Me Riverside, CA
Pop Up Camper Roof Replacement Riverside, CA
Near Seo Services Near Me Riverside, CA
Close By Seo Companies Riverside, CA
OCRV Center
Table of Contents
- – Rv Camper Repair Near Me Riverside, CA
- – OCRV Center
- – Camper Service Center Riverside, CA
- – Camper Repair Near Me Riverside, CA
- – Camper Awning Replacement Riverside, CA
- – Camper Trailer Repair Near Me Riverside, CA
- – Camper Repair Shop Riverside, CA
- – Camper Awning Replacement Riverside, CA
- – Camper Awning Repair Riverside, CA
- – Camper Services Riverside, CA
- – Camper Services Riverside, CA
- – Camper Air Conditioner Repair Near Me Rivers...
- – Pop Up Camper Repair Near Me Riverside, CA
- – Pop Up Camper Repair Riverside, CA
- – Camper Service Center Riverside, CA
- – OCRV Center
Latest Posts
Family Photography Session Montclair
Senior Care Providers San Jacinto
Home Health Aides Near Me Indio
More
Latest Posts
Family Photography Session Montclair
Senior Care Providers San Jacinto
Home Health Aides Near Me Indio