All Categories
Featured
Table of Contents
- – Camper Service Silverado, CA
- – OCRV Center
- – Rv Camper Ac Repair Silverado, CA
- – Camper Trailer Repair Near Me Silverado, CA
- – Pop Up Camper Roof Repair Silverado, CA
- – Pop Up Camper Repair Silverado, CA
- – Camper Repair Near Me Silverado, CA
- – Pop Up Camper Repair Silverado, CA
- – Camper Services Silverado, CA
- – Camper Repair Shop Near Me Silverado, CA
- – Camping Repair Near Me Silverado, CA
- – Camper Service Near Me Silverado, CA
- – Pop Up Camper Roof Replacement Silverado, CA
- – Camper Trailer Repair Near Me Silverado, CA
- – Camper Service Center Silverado, CA
- – OCRV Center
Camper Service Silverado, CA
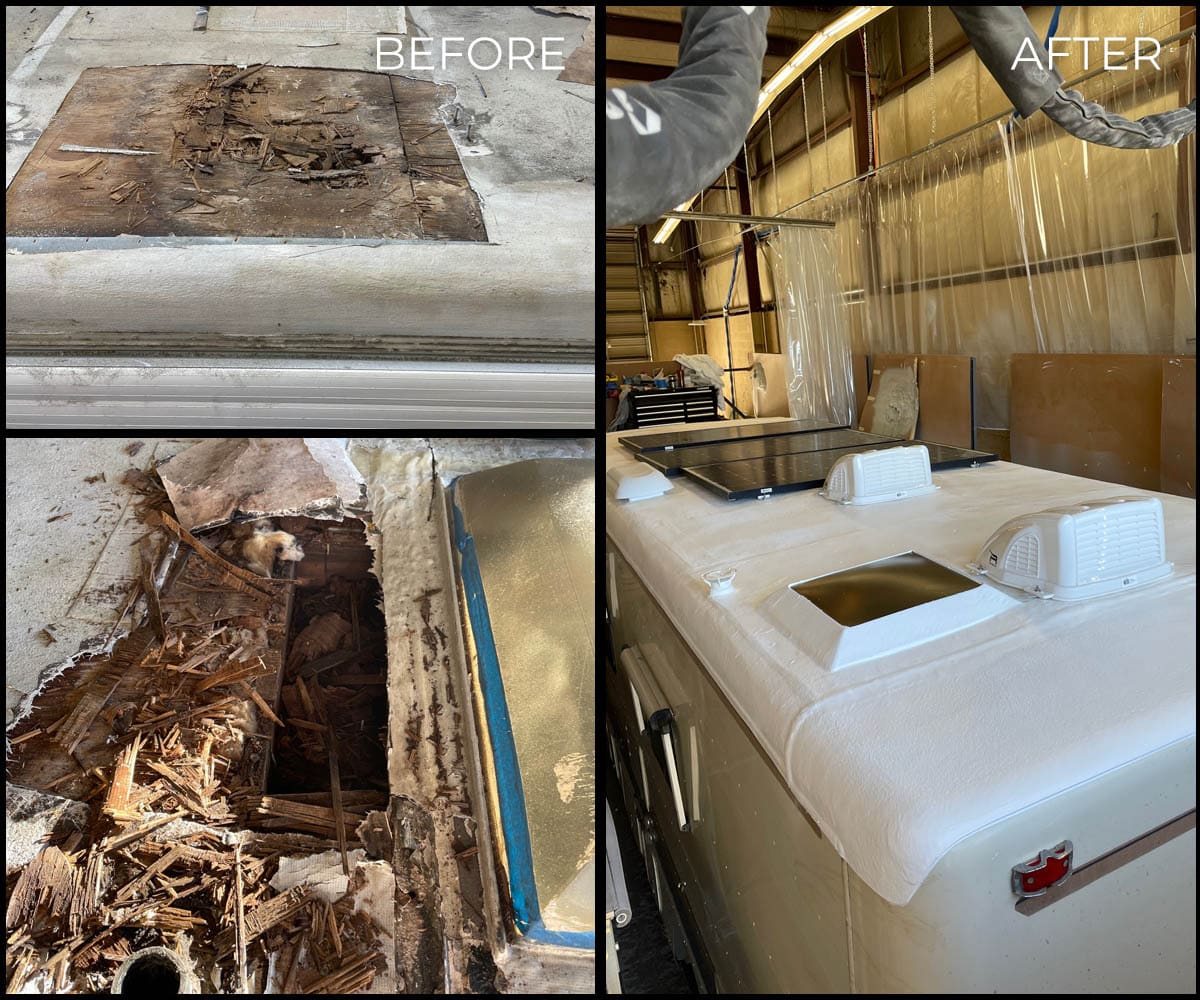
Fortunately, we really did not need to replace the interior 1 x 2 framework, and for that reason we could maintain the skin and foam affixed. To remove the 1 x 2 items that were still attached, I used a tiny, 4-1/2 portable round saw to cut from the bottom right along the edge of the 1 x 2.

I rebuilt this structure when the roofing system was removed from the camper, resting on the sawhorses. To create a precise dimension match of the side panels, you can use the old sides as a design template. If your old sides are so water harmed that they crumble right into small items (like mine did), then make use of the old aluminum skin that was connected to the old wood as your layout.
Rather, we determined to use 1 boards (which are in fact 3/4 thick). After that, to make up for the distinction in density, we simply used a router to scratch away 1/4 from completions where the boards would satisfy. (You could additionally simply cut the front and back panels 1/2 shorter than the initial panels to make up for the a little thicker sides.) I wrapped new white aluminum bed linen and affixed it to every side board with permanent get in touch with cement prior to connecting it to the camper.
Rv Camper Ac Repair Silverado, CA
Attach the sides boards to the lift arms. After the back and front of the roof framework was constructed, it was time to affix the ceiling (with the leading light weight aluminum skin still attached) to the camper.
I dipped each screw in Dicor Lap Sealer as a means to safeguard versus water sneaking in the in the future. You can see where we screwed the roof covering to the sides in the video listed below. I made use of contact concrete to connect the light weight aluminum roofing system skin to the back and front timber boards.
Camper Trailer Repair Near Me Silverado, CA
I'm working with a complete message on how to get rid of silicone caulk from a recreational vehicle and exactly how to get rid of old butyl tape residue. I'll link that right here as soon as it's ended up. The product I made a decision to make use of to make certain none of those joints took anymore water was Eternabond Tape.
Essentially, it's a rubberized tape that bends with changes in temperature and problems. It's uber sticky, and creates a water resistant seal. Update: I've been utilizing Eternabond tape for seven years on various campers and it is my best product for exterior recreational vehicle repair services. I have a complete article on this message in the works! I started with the side seams of my camper and used one long run of the tape across each seam.
There are a few methods to using this tape, and you need to take care concerning overlapping pieces, since sometimes water can still slip in. You can see more details on using this tape in the video listed below. After the roofing system is affixed back to the training braces, you can attach the canvas back to the roofing.
Because we made a decision to only replace the 1 x 2 exterior framework of the roof and reuse the foam and interior paneling, I most definitely required to find up with a service to cover up the part of the roofing system that had peeled off away since of the water damages. Below you'll discover the full tutorial on just how to make use of adhesive up ceiling ceramic tiles in a RV to offer the inside a completely face-lift.
Pop Up Camper Roof Repair Silverado, CA
We haven't had any leaks or water going into the camper yet! We maintain it saved outdoors (and are located in north Illinois where it rains, snows, and hails), however to be risk-free we covered it with a piece of 4 mil plastic, and afterwards put a tarpaulin on top of that for the winter months.
The trim strips that exist level on top of the camper (at the front and back) are usually covered with a motor home lap sealer, similar to the screw directly all the roofing system fixtures. On the sides, the rubber roofing system covers around the side of the camper and the trim strip is attached sideways of the camper in addition to the rubber.
Right here's exactly how to remove the roof trim molding during a motor home roofing repair task! Considering that one of the side trim moldings is also the awning rail (which holds the side of the awning canvas to the camper) I've divided this right into two messages. The 2nd one will reveal you just how to eliminate a RV awning.
Pop Up Camper Repair Silverado, CA
I selected to begin with the back discontinuation bar. As you can see it is entirely buried in lap sealer, RV roofing layer, and different caulking tasks from for many years. You can hardly tell it's there! Time to begin digging. As usual, I begin by reducing away any type of remaining rubber roofing system with an utility blade, right as much as the side of the trim.
The rear discontinuation bar (roofing system trim molding) is completely buried with lap sealant, caulk, and a recreational vehicle roof covering. I have actually reduced away several of the rubber and scraping up the lap sealant and caulk to subject the screw heads. Once you have actually subjected some screw heads and removed some screws you can begin raising the trim strip.
Camper Repair Near Me Silverado, CA
Keep in mind that the side trim has a plastic insert rather than lap sealant. Removing the last screw from the rear termination bar (roof covering trim molding.) Raising the molding and removing the last bit of rubber from beneath it. Several of the screws will certainly be rusty and tough to turn or simply rotating in their opening.
Occasionally I tear the up with the scrape while loosening them with an outlet hex head motorist. Often I make use of pliers. Once I obtained all the screws out and raised the trim molding, I tried scuffing away several of the RV roof finish that had repainted over it. It was nearly impossible.
Pop Up Camper Repair Silverado, CA
Remember, an 8 foot section of level trim molding prices $15 to $20 and they're tough to locate online. I hate to throw away able to be used materials but it's up to you to make a decision just how much your time deserves! Attempting to tidy up old recreational vehicle roof covering sealant from the level trim molding is not fun.
Virtually the same deal as the back one. I removed any kind of continuing to be rubber and began prying up sealant from the screw heads. The trim strip at the front edge of the rubber roof covering (aka discontinuation bar). This one is also hidden in layers of lap sealer, caulk, and roofing system layer repair services.
Camper Services Silverado, CA
That will have to be covered very carefully later with a self leveling lap sealer or a sealing tape, or both! When all the screw heads are exposed and eliminated, I peeled up the discontinuation bar and saw just how the layers were piled below.
That's since there is no lap sealer on the screw heads! Instead there is a plastic trim insert that fits inside the trim molding and covers the screw heads. These are tough to get to from the roofing top so I had to order my 10 foot action ladder to deal with removing this piece.
Thats because it was wrapped around beneath the end and selected with the trim strip. So I sufficed with an energy blade and after that started drawing out the plastic trim insert from the molding. Hurray! Clean screw heads! Starting to pull up the plastic trim insert from the side roof trim molding.
An information of the side of the camper roofing when the trim and rubber have been gotten rid of. So now there is just one piece of roof covering trim molding entrusted to remove: the one on the other side of the camper. Nevertheless, this is a little much more complex due to the fact that this trim item additionally occurs to increase as the awning rail which supports the canvas of the awning sideways of the camper.
Camper Repair Shop Near Me Silverado, CA
Directly over! Next up, eliminating the awning! (See following blog post.).
Learn added details regarding recreational vehicle insurance policy coverages and how the process benefits submitting a recreational vehicle insurance coverage claim. If the awning on your motorhome or travel trailer is harmed as a result of your negligence, it likely won't be covered by a typical motor home plan. If your awning weakens due to long-lasting sunlight direct exposure, that could be taken into consideration wear and tear and may not be covered.
These types of insurance coverage recommendations might not be available, especially if you reside in your RV full-time. If your RV's roof leak is the outcome of severe weather condition, you may be covered for RV roof damages if you can show the leakage resulted from the case. Nonetheless, a leakage that creates as a result of your oversight commonly won't be covered.
Camping Repair Near Me Silverado, CA
Maintain reading to find out several of the methods you can identify and repair recreational vehicle roof leaks. Not exactly sure how to begin? Below's a step-by-step overview I mapped out that I want somebody had offered me when I started my RV trip. When it comes to RV maintenance and fixings, the roofing must constantly be examined carefully and consistently.
Since your motor home roofing system is tidy, you're all set to seal! Before obtaining began, it's vital to keep in mind that when it comes to RV roof leakages, there isn't a one size fits all option. Each leak is distinct and depending on its size and location, it may need a particular kind of solution.
Motor Home Roof Covering Leak Fixing: Emergencies Benefits: Can be applied on a damp surface, making it perfect for a fast solution for smaller leakages during or after a storm. Pro Suggestion: See to it to use sufficient tape to conceal the opening or void totally, leaving concerning an inch of tape completely around the damaged location to obtain the best insurance coverage.
Camper Service Near Me Silverado, CA
Recreational Vehicle Roof Covering Leak Repair Work: Targeting Certain Areas Benefits: Great for a longer-term service. Pro Tip: Hold the can at a 45-degree angle and apply directly to the trouble location being dealt with.
Pro Idea: Prior to using this item, you'll want to make sure the surface area is completely dry. Be sure to properly test it on a little area initially prior to using it on a large surface area.
Pop Up Camper Roof Replacement Silverado, CA
While no RV roof covering lasts permanently, proper maintenance is important for its long life. With routine examination and the power of The Flex Seal Family Members of Products, you can aid extend your Motor home roofing's life and keep it going strong as you take pleasure in the terrific outdoors.
Asen is a full time RV traveler given that 2018 and is the owner of the blog site, Camper Life. He likes outdoor camping in nature, angling, and hanging out with his family members. Aiming to supply the most useful information regarding campers and RVs, he shares whatever he learned for many years.
Below's a detailed overview I mapped out that I desire somebody had offered me when I started my RV trip. When it comes to Recreational vehicle upkeep and repair services, the roof needs to constantly be checked carefully and regularly.
Since your motor home roofing is clean, you prepare to seal! Prior to getting began, it's important to note that when it comes to Recreational vehicle roofing system leaks, there isn't a one dimension fits all remedy. Each leak is unique and depending on its size and location, it might require a certain sort of repair.
Camper Trailer Repair Near Me Silverado, CA
Motor Home Roofing Drip Repair: Emergencies Advantages: Can be applied on a wet surface area, making it excellent for a fast fix for smaller sized leakages during or after a storm (Rv Camper Repair Near Me Silverado). Pro Suggestion: Make certain to utilize sufficient tape to conceal the hole or void totally, leaving regarding an inch of tape right around the affected location to get the very best insurance coverage
RV Roof Covering Drip Repair Service: Targeting Particular Locations Advantages: Great for a longer-term solution. Typically utilized around vents and various other seams that require resealing. Pro Pointer: Hold the can at a 45-degree angle and use directly to the problem area being treated. Flex Shot takes around 24-48 hours to cure and must be applied on a dry surface.
Pro Pointer: Prior to using this item, you'll wish to see to it the surface is completely dry. Make sure to properly evaluate it on a small location first before applying it on a large surface. Several coats are encouraged! You must allow 24-48 hours for the item to treat before each coat.
Camper Service Center Silverado, CA
Usage appropriate safety and security devices like gloves and protective eyeglasses as essential. Usage painter's tape and cover the areas you wish to prevent covering, especially joints and various other moving components. While no recreational vehicle roofing system lasts forever, correct upkeep is crucial for its long life. With normal assessment and the power of The Flex Seal Household of Products, you can aid prolong your recreational vehicle roof covering's life and keep it going strong as you take pleasure in the open airs.
Asen is a permanent RV tourist since 2018 and is the owner of the blog, Camper Life. He loves outdoor camping in nature, angling, and hanging out with his household. Aiming to give the most beneficial details regarding campers and Motor homes, he shares whatever he discovered over the years.
Camping Repair Near Me Silverado, CAPop Up Camper Roof Replacement Silverado, CA
Rv Camper Repair Silverado, CA
Camper Roof Replacement Silverado, CA
Camper Service And Repair Silverado, CA
Camper Service Near Me Silverado, CA
Camping Repair Near Me Silverado, CA
Camper Awning Repair Silverado, CA
Camper Services Silverado, CA
Camper Trailer Service Near Me Silverado, CA
Camper Air Conditioner Repair Near Me Silverado, CA
Rv Camper Repair Near Me Silverado, CA
Camper Repair Shop Silverado, CA
Camper Awning Repair Silverado, CA
Camper Repair Silverado, CA
Camper Service And Repair Silverado, CA
Pop Up Camper Repair Silverado, CA
Camper Trailer Service Near Me Silverado, CA
Rv Camper Ac Repair Silverado, CA
Camper Awning Repair Silverado, CA
Camping Repair Near Me Silverado, CA
Camper Service Silverado, CA
Camper Service Near Me Silverado, CA
Camper Services Silverado, CA
Camper Repair Silverado, CA
Pop Up Camper Roof Replacement Silverado, CA
Camper Service Silverado, CA
Camper Repair Shops Near Me Silverado, CA
Camper Air Conditioner Repair Near Me Silverado, CA
Pop Up Camper Canvas Repair Silverado, CA
Camper Repair Shop Near Me Silverado, CA
Camper Service Silverado, CA
Camper Repair Shops Near Me Silverado, CA
Camper Trailer Service Near Me Silverado, CA
Camper Service Silverado, CA
Camper Service Near Me Silverado, CA
Camper Roof Replacement Silverado, CA
Camper Trailer Repair Near Me Silverado, CA
Camper Repair And Service Silverado, CA
Camper Service Near Me Silverado, CA
Camper Repair Places Near Me Silverado, CA
Camper Repair Silverado, CA
Rv Camper Repair Silverado, CA
Camper Trailer Repair Silverado, CA
Camper Trailer Service Near Me Silverado, CA
Rv Camper Repair Near Me Silverado, CA
Pop Up Camper Roof Repair Silverado, CA
Camper Roof Repair Near Me Silverado, CA
Camper Roof Repair Near Me Silverado, CA
Camper Repair Silverado, CA
Camper Repair And Service Silverado, CA
Camper Roof Replacement Silverado, CA
Camper Trailer Repair Silverado, CA
Rv Camper Ac Repair Silverado, CA
Pop Up Camper Roof Repair Silverado, CA
Camper Awning Replacement Silverado, CA
Camper Awning Replacement Silverado, CA
Camper Service Silverado, CA
Camper Roof Repair Silverado, CA
Camper Trailer Repair Near Me Silverado, CA
Pop Up Camper Roof Repair Silverado, CA
Camper Trailer Repair Near Me Silverado, CA
Camper Roof Repair Silverado, CA
Camper Repair Near Me Silverado, CA
Camper Roof Repair Silverado, CA
Pop Up Camper Roof Repair Silverado, CA
Camper Awning Replacement Silverado, CA
Camper Service And Repair Silverado, CA
Pop Up Camper Roof Replacement Silverado, CA
Pop Up Camper Canvas Repair Silverado, CA
Rv Camper Repair Silverado, CA
Rv Camper Repair Silverado, CA
Camper Repair Shop Near Me Silverado, CA
Camper Awning Replacement Silverado, CA
Camper Repair Shop Silverado, CA
Pop Up Camper Canvas Repair Silverado, CA
Pop Up Camper Roof Replacement Silverado, CA
Pop Up Camper Repair Silverado, CA
Finding A Good Local Seo Companies Silverado, CA
Find A Seo Marketing Silverado, CA
OCRV Center
Table of Contents
- – Camper Service Silverado, CA
- – OCRV Center
- – Rv Camper Ac Repair Silverado, CA
- – Camper Trailer Repair Near Me Silverado, CA
- – Pop Up Camper Roof Repair Silverado, CA
- – Pop Up Camper Repair Silverado, CA
- – Camper Repair Near Me Silverado, CA
- – Pop Up Camper Repair Silverado, CA
- – Camper Services Silverado, CA
- – Camper Repair Shop Near Me Silverado, CA
- – Camping Repair Near Me Silverado, CA
- – Camper Service Near Me Silverado, CA
- – Pop Up Camper Roof Replacement Silverado, CA
- – Camper Trailer Repair Near Me Silverado, CA
- – Camper Service Center Silverado, CA
- – OCRV Center
Latest Posts
Atwood Rubber Roofing For Campers
Chino Repair Rv Roof
Rv Windshield Repair Near Me West Covina
More
Latest Posts
Atwood Rubber Roofing For Campers
Chino Repair Rv Roof
Rv Windshield Repair Near Me West Covina